Convert Data to Procare Cloud
- 17 Dec 2023
- 4 Minutes to read
- Print
Convert Data to Procare Cloud
- Updated on 17 Dec 2023
- 4 Minutes to read
- Print
Article Summary
Share feedback
Thanks for sharing your feedback!
For Procare Cloud Customers: Learn how to convert your data to Procare from SchoolLeader, Childcare Manager, or other supported child care management systems. Follow these instructions ONLY if you received a link to this page from Procare; otherwise, please Contact Procare Support for assistance.
Step 1: Prepare Your Data
Prepare the data in your current program so it is ready for conversion.
These steps are specific to SchoolLeader:
- Close the Accounting Period: If you are converting from SchoolLeader, it’s important that you close the Accounting Period so each family’s balance is correctly calculated. To get there in SchoolLeader, go to Accounting > Accounts Receivable > Close A/R Accounting Period. For details see: SchoolLeader Help – Closing the Accounting Period.
- Immunizations/Vaccinations: If you are converting from SchoolLeader, please make sure the Student Vaccine Schedule has each shot in a sequence named exactly the same; for example, you’ll want 3 occurrences of DTap to be named DTap, DTap, DTap (all the same) and not DTap1, DTap2, DTap3 (all different). This applies to each of your Vaccine Descriptions. To get there in SchoolLeader, go to Families > Student Vaccine Compliance > Edit Student Vaccine Schedule. For details see: SchoolLeader Help – Vaccine Schedules.
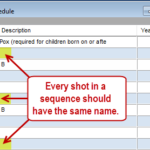
Click to Enlarge

These steps apply to all conversions:
- Active/Inactive Families: Make sure all families are correctly marked as active or inactive or whatever terminology your current program uses. This is especially IMPORTANT if you have a “Mini” version of Procare (with a 60-family limit).
- Enroll/Withdraw Dates: Make sure all enrolled children have an enrollment date and all withdrawn children have a withdraw date, even if the family is inactive.
- Date of Birth: Make sure the date of birth has been entered for each child.
- Separate People: Each parent/guardian should be entered as their own separate person. In other words, don’t enter a married couple as though they are a single person named “John & Mary Smith”. Enter them as “John Smith” and “Mary Smith”.
- Employment Dates: Make sure all staff members have a hire date. For staff who have left, they should have a termination date.
Step 2: Back Up and Update Your Existing Program
- As a precaution, make a backup in the program you are converting from, like SchoolLeader.
- Install the latest version of the program you are converting from. Follow that program’s instructions for how to update.
Step 3: Run the Conversion Utility
This utility will export the data from your current program.
Go to your main computer, the one that you run your current program on.
Download and run the Conversion Utility by filling out the form below.

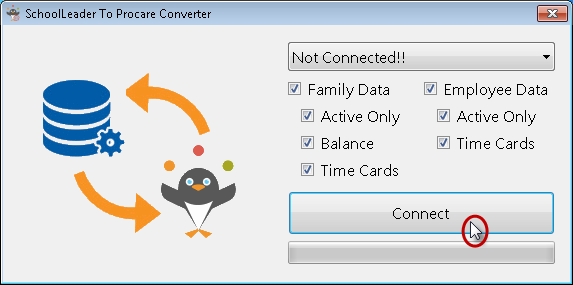
When the conversion program appears on screen:
a. It will say “Not Connected”. That’s okay. Just click the Connect button.
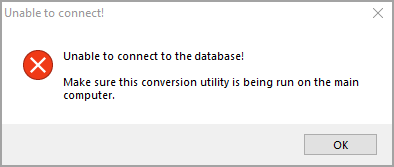
b. If it says “Unable to connect”, then this is not the main computer for your current program. Go to that computer and repeat these steps.
c. Once connected, the name of your school should be shown at the top (or it may just say School Leader). If you have more than one location, choose the first location you want to export from the drop-down list.
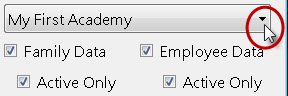
d. With the location selected (at the top), you may uncheck any items you do not wish to convert. For example, if you want all families (instead of just Active), remove the check next to Active Only.

e. Click Convert Data.


Note: Once the conversion is done, you’ll notice a .v10 file on your desktop; for example, ABC-Child-Care.v10 or SchoolLeader.v10. This file will be used later.

Step 4: Install Procare & Log In
Wait until you receive an email with your download link (letting you know your Cloud account has been created), then continue with these steps. This happens 1 business day after you’ve completed the Cloud Terms and Conditions.
- Download and install Procare Cloud (or use the link in your email). You’ll also need the Installation Key Number from your “Welcome” email.
- Log in for the first time (username: admin, password: admin) and run the Setup Wizard (see video: Part 1 – First Time Log In). Hint: Skip the step to add classrooms, those will be converted for you.
Step 5: Import your Converted data
Important! Import your data just one time. If you import a second time, all families will be duplicated.
Log into Procare as a System Supervisor (the login you just set up for yourself).
From the Procare Home screen, go to the Supervisor Utilities > Data Import/Export, then click Import.

Procare Data Import Utility
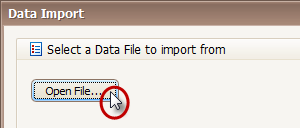
a. At the Data Import screen:
Click Open File and browse to the location of the .v10 export file you previously created. It should be on your Desktop named something like ABC-Child-Care.v10 or SchoolLeader.v10.
b. Pick a School Location to which the data will be imported and click Next.

Data Import - Select SchoolAt the Module Licensing Status screen:
a. If you want to import everything that is checked, click Next.

b. If you do NOT want to import something, uncheck the box (on the right) for that module. A yellow warning will appear and you’ll need to type the words I Accept and click Next.
Click Start Importing Data. The import process may take a while. When the import is complete click Exit.


Next Steps
Now that your data has been converted, you’re ready to learn how to set up and use Procare.
- Contact the Procare Training Team to schedule your FREE SETUP CALL. We’ll help you get off to a smooth start!
- Watch the First Time User video series. Continue with Part 2 – Getting Around Procare.
- Check out these other Free Learning Tools.
Was this article helpful?