Occasionally you may need to make an agency correcting entry to offset a mistake made when posting an Agency Payment.
Getting There
From the main screen of Family Data & Accounting click Functions | Agency Accounting | Agency Payment Posting.
Correcting Entry
Since a posted agency payment may not be voided or altered in any way, you may first need to post a reversing agency payment to correct the error, then re-post the payment correctly. The process varies depending on the type of mistake you need to correct. Select from the options on the right or scroll down.
Payment (or Adjustment) to Wrong Family
Once a payment or adjustment code has been applied to a charge, the charge becomes locked and cannot be changed; therefore, correcting entries must be made to reverse the original entry charges or adjustments and repost it using the correct information.
-
From the Agency Payment Posting screen:
a. Select the name of the agency from the pull down list (upper right). -
Identify which prior agency payment posting needs correcting.
-
Double click on the line item to see the postdate, comment, and the payment or adjustment.

-
The agency payment posting can be printed using the print button in the lower left corner or a saved screenshot when doing the agency correction.
- Check the box to Include previously balanced charges. Enter the number of prior
months (up to 12) to display the date of the charge on the agency payment posting. - Click View Current.
- Check the box to Include previously balanced charges. Enter the number of prior
-
A list of outstanding charges to that agency (and previously balanced charges) is displayed.
- Choose a Post Date. This is the date the transaction will be recorded. You may want this to match the date of the original posting.
- Enter a Comment i.e. “Correction – Check #123”.
- This correction does not affect the amount of the original check, therefore the Amount box (at the top) should say 0.00.
- In the Payment (or Adjustment) column:
- On the correct charge date, enter the correct amount for the child to whom the payment (or adjustment) should have been posted, for example 100.00. If this is an adjustment be sure to use the same Adjustment Code as originally used.
- On the charge and comment in the agency payment posting copy enter an offsetting negative amount for the child to whom it was accidentally posted, for example -100.00. If this is an adjustment be sure to use the same Adjustment Code as originally used.
- The total at the top of the Payment column must now be zero.
- The total at the top of the Adjustment column would normally be zero as well, but it doesn’t have to be. You may make an adjustment by itself that doesn’t have an offsetting entry, if needed.
- Click Post & Exit.
The amount of the deposit has not changed so no correction to the Deposit Report is needed.
Adjustment for Wrong Amount was Posted
Once a payment or adjustment code has been applied to a charge, the charge becomes locked and cannot be changed; therefore, correcting entries must be made to reverse the original entry and repost it using the correct date.
-
At the Agency Payment Posting screen:
- Select the name of the agency from the pull-down list (upper right).
-
Identify which prior agency payment posting listed under the name of the agency needs corrected.
-
Double click on the line item to see the postdate, account. and comment of the charge the payment and adjustment, if any, were applied too.
-
The agency payment posting can be printed out with the print button in the lower left corner or a screen shot saved as reference when doing the agency correction.
- Check the box to “Include previously balanced charges”. Enter the number of prior
months (up to 12) to display the date of the charge on the agency payment posting that you have a copy of. - Click View Current.
- Check the box to “Include previously balanced charges”. Enter the number of prior
-
A list of outstanding charges to that agency (and previously balanced charges) is displayed.
- Choose a Post Date. This is the date the transaction will be recorded. You may want this to match the date of the original posting.
- Enter a Comment like “Correction – Check #123”.
- This correction does not affect the amount of the original check. Therefore the Amount box (at the top) should say 0.00.
- In the Adjustment column:
- Enter a correcting amount for the child to whom the adjustment was originally posted. If you understated the credit (the credit was entered as less than it should have been) enter a positive amount to make up the difference. If you overstated the credit (the credit was entered as more than it should have been) enter a negative amount.
- Be sure to use the same Adjustment Code as originally used.
- The total at the top of the Payment column must be zero.
- The total at the top of the Adjustment column will be positive or negative depending on the correction made.
- Click Post & Exit.
The amount of the deposit has not changed so no correction to the Deposit Report is needed.
Adjustment was Posted using the Wrong Adjustment Code
Once a payment or adjustment code has been applied to a charge, the charge becomes locked and cannot be changed; therefore, correcting entries must be made reverse the original entry charges or adjustments and repost it using the correct information.
- Reverse the original entry. At the Agency Payment Posting screen:
- Select the name of the agency from the pull down list (upper right). Identify which prior agency payment posting listed under the name of the agency you need to do the agency correction on.
- Double click on the line item to see the postdate, account. and comment of the charge the payment and adjustment, if any, were applied too.
The agency payment posting can be printed out with the print button in the lower left corner or a screen shot saved as reference when doing the agency correction.
2. Check the box to “Include previously balanced charges”. Enter the number of prior
months to display the date of the charge on the agency payment posting that you have a copy of.
3. Click View Current.
2. A list of outstanding charges to that agency (and previously balanced charges) is displayed.
1. Choose a Post Date. This is the date the transaction will be recorded. You may want this to match the date of the original posting.
2. Enter a Comment like “Correction A – Check #123”.
3. This correction does not affect the amount of the original check, therefore the Amount box (at the top) should say 0.00.
4. In the Adjustment column:
1. Enter a negative amount to reverse the adjustment for the child to whom it was originally posted.
2. Be sure to use the SAME Adjustment Code as originally used.
3. The total at the top of the Payment column must be zero.
4. The total at the top of the Adjustment column will be negative.
5. Click Post & Exit.
3. Re-post using the correct adjustment code. At the Agency Payment Posting screen:
1. Click View Current again.
4. A list of outstanding charges to that agency (and previously balanced charges) is displayed.
1. Choose a Post Date. This is the date the transaction will be recorded. You may want this to match the date of the original posting.
2. Enter a Comment like “Correction B – Check #123”.
3. This correction does not affect the amount of the original check, therefore the Amount box (at the top) should say 0.00.
4. In the Adjustment column:
1. Enter the correct amount for the child to whom it was originally posted.
2. Be sure to use the CORRECT Adjustment Code as this time.
3. The total at the top of the Payment column must be zero.
4. The total at the top of the Adjustment column will be positive.
5. Click Post & Exit.
The amount of the deposit has not changed so no correction to the Deposit Report is needed.
A Payment was Posted for the Wrong Total Amount or Incorrect Comment
Once a payment or adjustment code has been applied to a charge, the charge becomes locked and cannot be changed; therefore, correcting entries must be made to reverse the original entry and repost it using the correct date. It is recommended for clarity to enter a reversing entry for all payments, and adjustments entered in the agency payment posting and then re-post a new payment for the full correct payment amount, as we suggest here.
- At the Agency Payment Posting screen:
-
Select the name of the agency from the pull down list (upper right).
-
Identify which prior agency payment posting listed under the name of the agency you need to do the agency correction on.
-
Double click on the line item to see the postdate, account. and comment of the charge the payment and adjustment, if any, were applied too.
-
The agency payment posting can be printed out with the print button in the lower left corner or a screen shot saved as reference when doing the agency correction.
-
Check the box to “Include previously balanced charges”.
-
Click View Current.
-
- A list of outstanding charges to that agency (and previously balanced charges) is displayed.
- Choose a Post Date. This is the date the transaction will be recorded. You may want this to match the date of the original posting.
- Enter a comment like “Correction – Check #123, part A”.
- This correction DOES affect the amount of the original check. Enter a negative in the Amount box (at the top) to reverse that portion of the payment for example -100.00.
- In the Payment column:
- Enter a correcting amount for the charges to whom the payment was originally posted. Use a negative number to reverse the payment like -100.00.
- The total at the top of the Payment column must match the correcting entry. In this example both should say -100.00.
- The total at the top of the Adjustment column should be zero.
- Click Post & Exit.
- Click the View Current button again and record the correct amount.
- Choose a Post Date. This is the date the transaction will be recorded. You may want this to match the date of the original posting.
- Enter a comment like “Correction – Check #123, part B”.
- Enter a positive number in the Amount box (at the top) to reflect the correct amount of the payment for example 125.00.
- In the Payment column:
- Enter the correct amount for the charges to whom the payment was originally posted. Again, use a positive number 125.00.
- The total at the top of the Payment column must match the new entry. In this example both should say 125.00.
- The total at the top of the Adjustment column should be zero.
- Click Post & Exit.
- The amount of the deposit has changed. Open the Deposit Report and add the two correcting items to the report.
- From the main screen of Family Data & Accounting click Functions > Family Accounting > Deposit Reports.
- At the Deposit Reports screen double-click the deposit you wish to re-open.
- Click the Show All button (lower left) so the correcting entries are available and add them to the report.
- Click the plus sign (+) next to the payment category (like Pmt by Agency) and check the items you wish to add.
- Under Deposit Accounts enter the correct amount of the deposit. Both amount totals should appear in green.
- Click Close Report.
Payment for Wrong Date
Once a payment or adjustment code has been applied to a charge, the charge becomes locked and cannot be changed; therefore, correcting entries must be made to reverse the original entry charges or adjustments and repost it using the correct information.
- At the Agency Payment Posting screen:
-
Select the name of the agency from the pull down list (upper right).
-
Identify which prior agency payment posting listed under the name of the agency you need to do the agency correction on.
-
Double click on the line item to see the postdate, account. and comment of the charge the payment and adjustment, if any, were applied too.
-
The agency payment posting can be printed out with the print button in the lower left corner or a screen shot saved as reference when doing the agency correction.
-
Check the box to Include previously balanced charges. Enter the number of prior
months back to display the date of the charge on the agency payment posting that you have a copy of. -
Click View Current.
-
- A list of outstanding charges to that agency (and previously balanced charges) is displayed.
- Choose a Post Date that matches the original wrong posting date.
- Enter a Comment like “Reverse Ck#123”.
- This correction COMPLETELY reverses the original check. Enter a negative in the Amount box (at the top) to reverse the payment for example -2234.00.
- In the Payment column:
- Enter a correcting amount for each child to whom the payment was originally posted. Use a negative number to reverse the payment like -225.00.
- The total at the top of the Payment column must match the correcting entry. In this example both should say -2234.00.
- The total at the top of the Adjustment column should be zero.
- Click Post & Exit.
- Click the View Current button again and record the correct amount.
- Choose a Post Date which is the correct posting date for the payment.
- Enter a Comment like “Re-Post Ck#123”.
- Enter a positive number in the Amount box (at the top) to reflect the correct amount of the payment for example 2234.00.
- In the Payment column:
- Enter the correct amount for each child to whom you reversed the payment for in step 2 above. Again, use a positive number for each child like 225.00.
- The total at the top of the Payment column must match the new entry. In this example both should say 2234.00.
- The total at the top of the Adjustment column should be zero.
- Click Post & Exit.
- The amount of the two payments offset each other, but must be closed on a deposit report. Open the Deposit Report to include the two correcting items to the report, with a net deposit amount of zero.
- From the main screen of Family Data & Accounting click Functions > Family Accounting > Deposit Reports.
- At the Deposit Reports screen double-click the deposit you wish to re-open.
- Click the Show All button (lower left) so the correcting entries are available and add them to the report.
- Click the plus sign (+) next to the payment category (like Pmt by Agency) and check the items you wish to add.
- Under Deposit Accounts enter the correct amount of the deposit. Both amount totals should appear in green.
- Click Close Report.
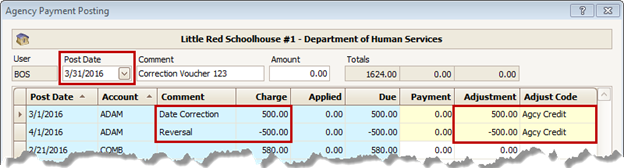
Agency Charge was Posted Using Wrong Date
Once a payment or adjustment code has been applied to a charge, the charge becomes locked and cannot be changed; therefore, correcting entries must be made to reverse the original entry charges or adjustments and repost it using the correct date.
In the example below, a payment from March 31, was accidentally applied to a charge from April 1. The charge should have been dated March 1, since payments are received one month in arrears.
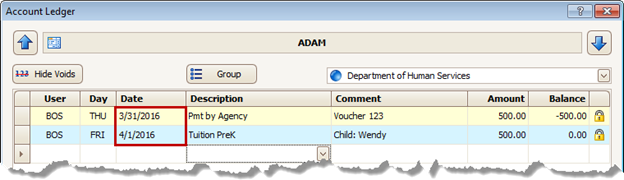
- On the agency ledger, make a new entry to reverse the mistake.
- Use the same date as was used on the entry you want to reverse.
- Use the same description as was used on the entry you want to reverse, such as “Tuition PreK”.
- Enter the amount as a negative, like -500.00. The balance on the ledger will temporarily be too low because you’ve posted a negative charge to lower the amount owed.

- Also, on the agency ledger, make a new entry to repost the charge using the correct date.
- Use the date you intended to use in the first place.
- Use the same description as was used on the entry you reversed, such as “Tuition PreK”.
- Enter the amount as a positive, like 500.00.The balance on the ledger should now be correct (it matches the balance you started with) and revenue will now count on the correct date.

- Now go to the Agency Payment Posting screen to close out the two corrections.
- Select an Adjust Code for each of the two entries and the amounts will be entered automatically. One should be a positive and the other a negative.
- Although the Post Date doesn’t really matter (since these two entries cancel each other out), you may want to use the date the original payment from the agency was received.