On the child Information & Relationships screen you’ll assign their Primary Classroom and add people who are connected to the child including their parents or guardians, emergency contacts and authorized pick up persons. You may add other people as well such as a doctor or dentist.
Getting There
Look up a Family and click once on the name of the child to select them.
Assign Classrooms & Link People to Each Child
- With the child’s name selected click the *Information & Relationships *icon (with the people) on the child toolbar.

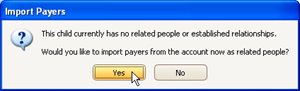
- Import the Payers: The first time you add people you’ll be asked if you would like to Import Payers (typically the parents or guardians). In most cases you’d want to say Yes.
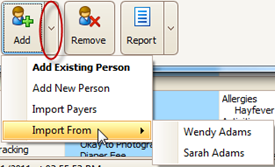
- Add other people connected to this child such as a divorced parent, emergency contact, pickup person, doctor, etc. Click the tiny arrow on the Add button and choose either add a New Person or Existing Person if the person is already in your database (they may be an employee or part of another family, etc.) or Import From another child in the family who has already been set up.
- Choose how each person is related to the child from the Relationship list (like mom, dad, etc.).
- Check off who the child Lives With as well as Emergency contacts (such as: Dr. / Physician ) and authorized pickup persons. The Pickup box must be marked in order for them to check children in.
- Select a Primary Classroom for this child (upper right).
- If you have the Meal Tracker module select a Food Program reimbursement status (just below the classroom) such as Free, Reduced or Above Scale.
- Click Save > Exit.