MyProcare is a parent portal available to Procare Cloud customers, that serves two primary purposes:
- New families may register online or be placed on a wait list. See “Best Practices” below.
- Current families have access to information, such as child schedules, time cards, immunizations, log sheets, financial history and their balance due, as well as make mobile payments (for centers with Tuition Express), and re-register their children.
Best Practices
For brand-new families:
- We recommend using the New Family Registration feature (described below) to gather minimal information from families. When using the Question Manager, ask as few questions as possible—only what you need to know to choose whether to import them into Procare.
- Once imported, families will be able to go through re-registration to answer a more complete set of questions you create and pay any registration fees (for centers using Tuition Express).
For current families:
- Use the features described below to give families access to information, print reports, make payments (for centers using Tuition Express), and schedule their children.
- Current families may also re-register their children.
How to Set Up & Use MyProcare
Choose to enable the features you want to use. We recommend you watch the following pre-recorded webinars, each broken into short segments.
- Webinar Series 1: Set up MyProcare for new family registration.
- Webinar Series 2: Set up MyProcare for existing families to access information, make payments, schedule their children, and re-register.
Setup
Select from the options below:
Run the Setup Wizard to turn MyProcare on and choose your settings
Setup Wizard
- Log into Procare as a System Supervisor.
- From the main screen of Family Data & Accounting, go to MyProcare > Setup Wizard.

Using the Setup Wizard
Click Next to move through the Wizard, selecting settings as you go.
- At the Welcome – General Settings screen:
- Click the Load School button to enter the information for the center. You may set Show School Address to “false” if you don’t want the address to display on the MyProcare website.
- If you have not yet loaded Text Networks (screen will display “You currently have: 0”), click the Text Networks button and select Download & Update. Select Yes, and Exit.
- Click Next.
- At the Current Families screen, you can enable/disable MyProcare and 2-Step Verification for existing families.

- The MyProcare – General Settings screen allows you to:
- Be notified when a family makes a change to their contact information. (Select true on the Enable Contact Info Change Email Notification line, and then enter the email you want the notification sent to).
- Select the Parent Limits button to limit what existing parents can see and do on their MyProcare link.

- The Current Families – Scheduling screen is next. If you want to allow current families to create and modify schedules, select True to the Enable Scheduling choice and the additional options will become available for selection. See: Turn on Family Selected Scheduling.
- Next are Re-registration Settings. See: Set Up and Use Re-registration.
- On the New Family Sign-Up screen select True to allow new families to register through MyProcare. Select Next.
- On the New Family Sign-Up – General Settings screen, you can:
- Select the level of automation you want when importing new families. There are three levels of interaction:
a. Use Import Screen – Recommended. You review and choose how the families will be brought into Procare.
b. Mostly Automatic – All families are directly imported into Procare, except for duplicates.
c. Fully Automatic – No interaction at all. Families are automatically imported (duplicates are ignored). - Include a signature line in the summary confirmation that is emailed to the parent.
- Enter an email address for the center, if you wish to receive a notification when a new family signs up.
- Enter an email address for parents to contact the center with any questions (the question mark on their registration form allows them to email center for help). Select Next.
- Question Manager is discussed separately in the next section of this article.

- New Family Sign-Up – Account Settings screen – Here you define your Account Key names, user defined fields, and tracking items that will be used when you import a family. These are account level settings.

- Online Registration – Child Settings screen – You can set user defined fields and tracking items that will attached to the child (vs. the account). You may wish to leave all but the Enrollment Status blank, and have the tracking set at the account level instead.

- The last action you will need is to look over the Review screen. If you need to change something, click Back. If you are ready to write the changes in, click Save. You can always make changes later if needed.
- Select the level of automation you want when importing new families. There are three levels of interaction:
Use the Question Manager to create questions for new families to enter
Question Manager
Create questions for new families to answer when they register online.
- From the main screen of Family Data & Accounting, go to MyProcare > Question Manager.

- Choose to create New Account questions (for the family as a whole) and New Child questions (answered separately for each child).
a. Click on the Type (New Account or New Child) and then click Edit (or just dbl-click New Account or New Child).
b. Optional: enter a Nickname, if you like, to describe this set of questions; for example, “Questions about the family as a whole”.

Create Registration Questions for New Families
Watch the video below for more details.
Get links to place on your website or email them to families.
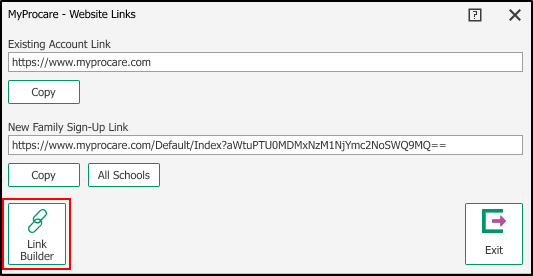
- From the main screen of Family Data & Accounting, go to MyProcare > Website Links.

- You may copy the Existing Account Link for current (existing) families. All of the school/locations in your database will use the same link.
- Use the Copy button to copy the New Family Sign-Up Link specific to the school you are in. If you have multiple schools, use the All Schools to export a list of links for all locations in your database. New families must use the link for their specific location.

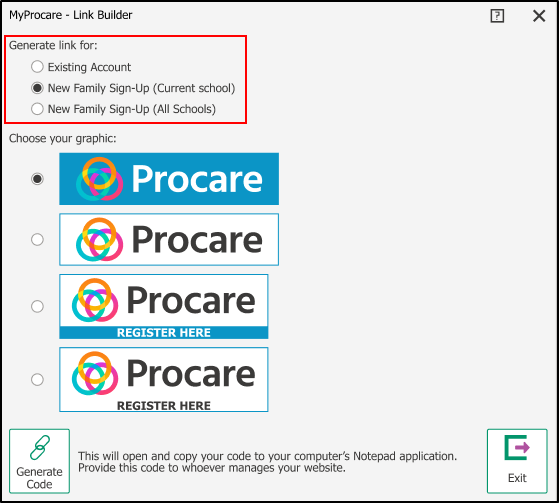
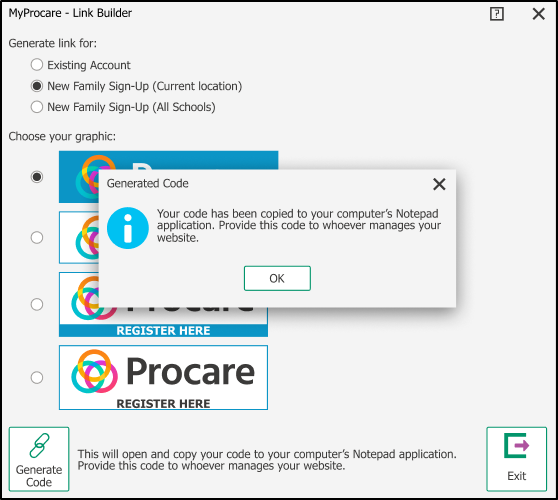
MyProcare Link Builder
If you want your website to have a graphic image for the MyProcare link, use the MyProcare Link Builder.
-
Navigate to Family Data & Accounting.
-
Click MyProcare, then select Website Links.
-
On the 'MyProcare - Website Links' popup, click Link Builder.
-
Choose what you want to generate a link for: Existing Account, New Family Sign-Up (Current school) or New Family Sign-Up (All Schools).
-
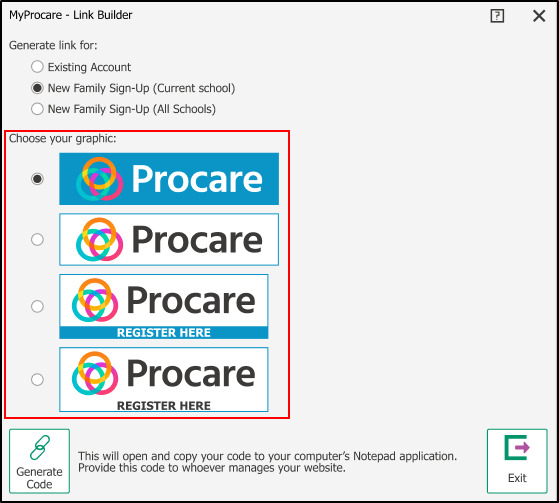
Choose your graphic.
-
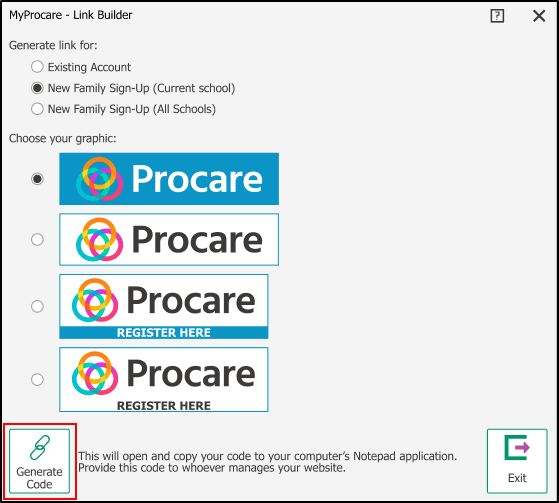
Click Generate Code.
-
The link will be copied to your clipboard to be inserted on your website.
Share MyProcare Link with Families
Watch the video below for a complete walk through.
New Family Registration
Learn how a new family enrolls online
New families will click a link on your website to register online.
- The family will begin by entering their email address.
- A confirmation number will be sent to their email and they’ll enter this number to log in.
- The family will enter information about themselves and their children and answer questions you’ve set up using the Question Manager.
Watch the video below for more details.
Review & Import Families
In most cases you’ll review new families and decide whether to import them into Procare.
From the main screen of Family Data & Accounting, go to MyProcare > Review & Import.

Import New Families
Note: A grayed out child does not match your selection.
Duplicate People
When importing leads into Procare from MyProcare or other third-party lead management applications, the system clearly identifies duplicate accounts or accounts that have potential duplicate people and gives a quick and easy way to resolve the duplicates.
- If alerted about a duplicate person, an existing person can be selected in Procare to tie to an account or create a new person.
- If alerted about a duplicate account, you can select an existing Procare account to import the leads into or create a new account.
From the main screen of Family Data & Accounting, go to MyProcare > Review & Import.

Details About Duplicate People
Watch the video below for details on how to handle duplicate people during the import process.
Download Email Templates for Families using MyProcare
You may download letter templates to introduce families to MyProcare which includes a link and instructions to log in. The templates will appear in the Letter Merge feature and may be emailed to all families (or a select group) at once.
Download the Letter(s)
- From the main screen of Family Data & Accounting, go to Utilities > Download Procare Support File.
- Enter a password of MP01.
- Check the box for any of the introductory MyProcare letter(s) you may want to mail out, and click Install.

Click the video below for more details.
Email the Introducing MyProcare Letter
- To invite parents to log into MyProcare you may email them a letter. From the main screen of Family Data & Accounting, select the Merge Letters icon on the Account Toolbar.

- Choose Open Letter (top left).

3. Select Introducing MyProcare (or any of the introductory letters you downloaded).

4. Choose Email. The letter will be sent as a .pdf attachment. In the text of your email be sure to let families know to open the attached file for instructions.

Configure & Access MyProcare for Current Families
Current families will click a link from your email or on your website.
- The family will begin by entering their email address.
- If they haven’t already selected a password, a confirmation number will be sent to their email and they’ll enter this number and choose a password to log in. If they already have a password, the confirmation number step is skipped.
- Once logged in, the parent may need to select which center to log into (if their email address is found at more than one center). Once there, they can view information, update their phone or address, or make a payment (depending on which options you have allowed).
Watch the video below to see how a current family logs in and uses MyProcare.