Payroll Direct Deposit
- 15 Dec 2023
- 4 Minutes to read
- Print
Payroll Direct Deposit
- Updated on 15 Dec 2023
- 4 Minutes to read
- Print
Article Summary
Share feedback
Thanks for sharing your feedback!
Direct Deposit for employee paychecks allows centers to avoid printing and physically distributing paper checks to employees. Direct deposits are made through a system known as Automated Clearing House (ACH), which is an easy way to have payroll checks deposited directly into each employee’s checking or savings account.
Before You Begin
- You must be running Procare Version 10.2.5273 or higher.
- You must be currently using the Payroll module.
- Create a folder on your computer for storing files you will transmit to the bank.
Things to ask your bank
Let them know that you are using a third party program (Procare) that creates an ACH file that you would like to use.
At a minimum, here are some questions to ask:
- What does the bank charge for their service?
- Do I need to create a special account with the bank for this process?
- How does the bank want the file sent to them?
- I also need a company ID number as part of the mandatory formatting of ACH. I have been told this number could be 1 + my tax ID, is this acceptable or does the bank provide a unique number?
- Does the bank require a Prenote?
- How many days prior to the settlement date does the bank need the file?
Things to Know
Procare will output either a standard Payroll Direct Deposit NACHA file or an “offset” file. No other formats are supported.
Authorization Form for Employees
You’ll need authorization from each employee who wants to participate, including the routing and account numbers for their bank. You may use this Direct Deposit Authorization Form or create your own.
Download the Direct Deposit “Extra”
- Log on to your computer with local administrator privileges and close all programs, including Procare.
- Download
- When installation is complete, restart Procare.
Getting There
From the Procare Home screen go to Utilities > Procare Extras > Direct Deposit.

First Time Setup
Choose “Select Checkbook” and pick the account from which payroll is issued.

If prompted, run the Bank Account Configuration. Enter the necessary information (displays in uppercase letters). Click Save > Exit. If Save is grayed out, it means the routing, bank account or Company ID is incorrect.


Note: The Company ID Number is usually 1+ your tax ID number.
You are now on the Direct Deposit screen. Select the Employee List button and double-click any employee highlighted in pink, that is electing to use direct deposit.
Enter the required information for each employee’s account. When all employees electing direct deposit have been updated, select Save > Exit.

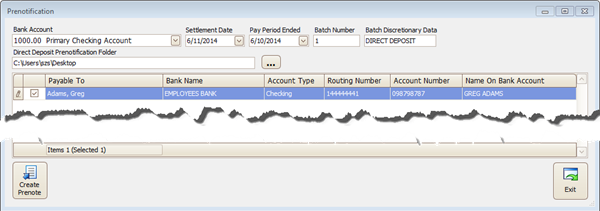
Skip this step if your bank does not require a Prenotification file (essentially a $0 transaction file). If it is required, select Employee Prenote, and the Prenotification screen appears. Select the location for the file and the employees to be included. Select Create Prenote, Exit the screen, then transmit the file to the bank according to their directions.


Create Direct Deposit File
Do your Payroll Check Calculation just as you would if printing checks, BUT select Post & Print Later, rather than printing them.
From the Procare Home screen go to Utilities > Procare Extras > Direct Deposit. Once you select the checking account used for the Direct Deposit, the screen below with all checks waiting to be “printed” appears.
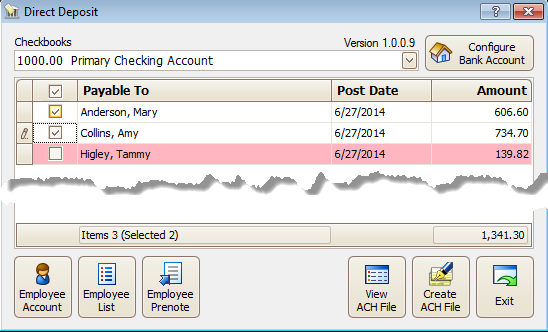
Anyone highlighted in pink does not have sufficient information regarding their bank account. If you have their information, double-click their name and correct the record. If not, you can print their check with the other non-direct deposit employees at the end of the process.
Select employees to include on the NACHA file.
Click Create ACH File.

The Create ACH File screen summarizes the employees and net check amounts that will be in the NACHA file. Click Next if everything appears to be correct, or Exit if further editing is needed.
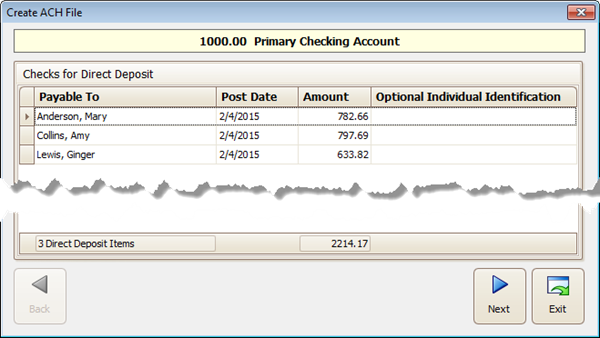
At the *Create ACH File *screen, hold your mouse over a box for a helpful tool tip.
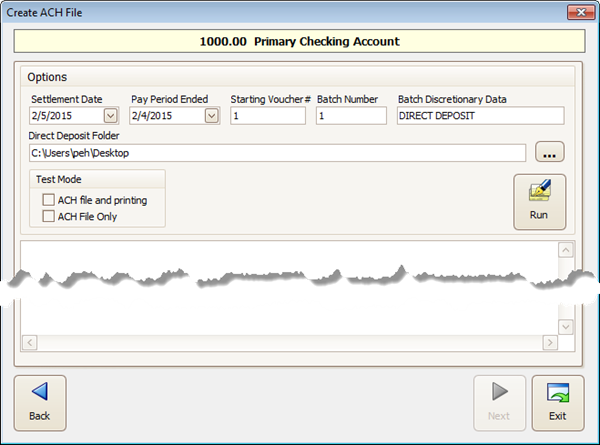
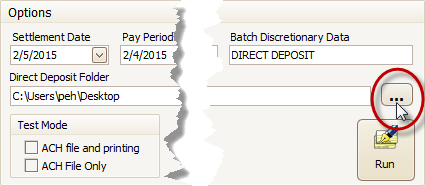
Click the button on the right hand side with the three dots (…) to select the Direct Deposit Folder (the location to save the file). The Settlement Date must be tomorrow or later and on a regular banking day for your bank (your bank will clarify this). If the bank isn’t posting on the settlement date you specified, they will reject the batch.


Important! The Test Mode is for your internal testing only. Do NOT send a file created in Test Mode to the bank.

Click Run when you are ready to create the file and print the employee payroll stubs on plain paper. See: Sample Check Stub.

Verify the stubs printed correctly, then click Exit.
Transmit the NACHA file according to your bank’s directions.
Employees not electing to use direct deposit, and those you did not submit in the NACHA file, may have their checks printed at this time using Batch Print Payroll Checks.

NACHA File (optional)
You may edit the NACHA file. This may be helpful if, for example, the bank has rejected it due to an invalid settlement date. See: How can I edit the NACHA file?
Was this article helpful?