Photo Editor
- 05 Dec 2023
- 1 Minute to read
- Print
Photo Editor
- Updated on 05 Dec 2023
- 1 Minute to read
- Print
Article summary
Did you find this summary helpful?
Thank you for your feedback!
Store a picture, photograph or image for any person in Procare including children, parents, authorized pick up persons, emergency contacts, employees, etc. Photos may be imported from a folder on your computer, or any device connected to the computer, like a smartphone, digital camera, USB drive, SD memory card, etc.
Getting There
You may access the Person Information from a number places depending on whether the person is a child, parent, employee, etc. The most common ways to get there are to Look Up a Family or Search for a Person.
Add a Photo to a Person
- Go to the person for whom you wish to add a photo or change an existing photo. Dbl-click on or near the name of the person to open their Person Information screen.

Note: For authorized pick ups, etc., you’ll first need to click the Information & Relationships icon on the child toolbar to see their name.

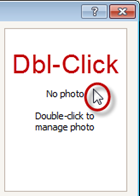
- At the Person Information screen, dbl-click the box (top right) where it says “No photo”. If you’re changing an existing photo, just dbl-click directly on the photo.
 or
or 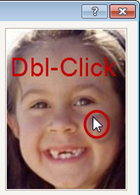
- Click Import Image (bottom left) and browse to the folder or other location on your computer where the image is located. Dbl-click the image to open it in the Photo Viewer.

Crop the image:
a. Click once on the image to display a white cropping rectangle. You’ll want the face of the person to fit inside this rectangle.

b. Drag the Zoom control to adjust the image so the face is the appropriate size and use the Right / Left buttons to rotate the image as needed.
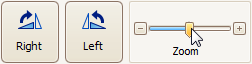
c. Drag the cropping rectangle so it is centered on the face, then click the Select (bottom right). You’ll return to the Person Information screen with the photo displayed.

Click Save > Exit.
Was this article helpful?