ChildcareCRM Extra
- 08 Feb 2024
- 9 Minutes to read
- Print
ChildcareCRM Extra
- Updated on 08 Feb 2024
- 9 Minutes to read
- Print
Article summary
Did you find this summary helpful?
Thank you for your feedback!
ChildcareCRM Extra
Learn how to use Procare’s free ChildcareCRM Extra to import family and child information from your CRM wait list into Procare, and to sync information two-directions (from ChildCare CRM to Procare and from Procare to ChildcareCRM).
Before You Begin
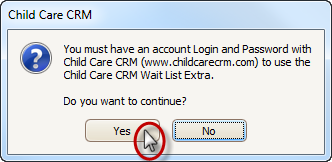
- You must have an account with ChildcareCRM and know how to use it to manage your waiting list. See Instructions from ChildcareCRM.
- If you wish to import marketing information from ChildcareCRM to the Child’s Log Sheet in Procare, create a child Log Sheet Type under which to record them such as “ChildcareCRM”.
Which Families Export from ChildcareCRM?
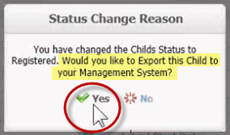
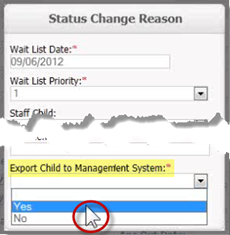
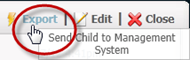
When you set a child’s status to “Registered” or “Wait List” in ChildcareCRM, you’ll have the option to mark them for export to your management system (meaning Procare). If you say ‘no’ you may choose to export them later. For questions on this topic, please Contact ChildcareCRM.
| Status changed to “Registered” | Status changed to “Wait List” | Choose to “Export” later |
|---|---|---|
 |  |  |
Getting There
From the Procare Home screen go to Utilities > Procare Extras > Child Care CRM.
First Time Setup – Log In and Map Locations
The very first time you set up the ChildcareCRM extra, you must log into Procare as a System Supervisorsystem  ; however, it is not necessary to be a System Supervisor just to run the extra—for example, to import families. Your credentials will be stored in the Procare system using the most up-to-date industry standard encryption available.
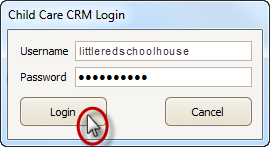
If you have not yet set up your login information for ChildcareCRM, you’ll be prompted for that information. Click “Yes” to continue.
Next, enter your personal Username and Password for ChildcareCRM and click Login.
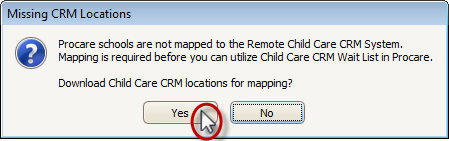
You’ll be prompted to download the list of locations from ChildcareCRM. Click “Yes”.
It’s not necessary to have a ChildcareCRM location for every Procare location, but you’ll only be able to import from the locations that are mapped. The system will attempt “map” your CRM Location (right side) to go with each Procare School location (left side). Choose a different CRM location if a field is empty or incorrect.
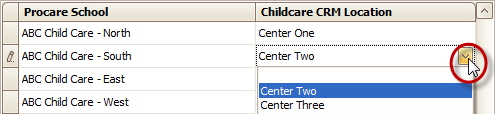
Note: If you’ve recently added locations within ChildcareCRM click Refresh Locations to update the choices within Procare.

Click Save > Exit. This will take you to the main screen of the ChildcareCRM Wait List.

Hint: From the main screen, you may return to make changes or additions to the mapping by using the Location Mapping button. You must be a member of the System Supervisor group in Procare


Mapping Enrollment Statuses
Use this option to allow Procare to send ChildcareCRM enrollment statuses along with the account information.
The sync with ChildcareCRM will occur when at least one Procare enrollment status is mapped to a ChildcareCRM status and reason code.
Please Note: This functionality is only available with the Procare Version 2022.3 or higher.
Select Status Mapping from the ChildcareCRM Wait List window.

The Map ChildcareCRM Statuses window will display. If the CRM Status column is empty, status mapping has not been set up. All current Procare enrollment statuses will display under the Procare Enrollment Status column.
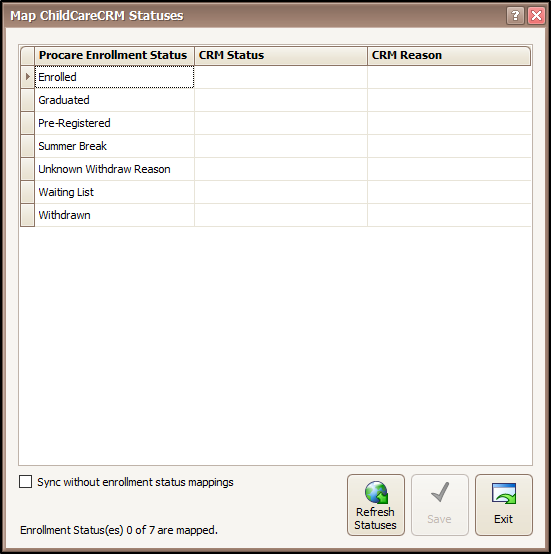
To the right of each Procare enrollment status, use the drop-down fields to map the CRM Status and CRM Reason.
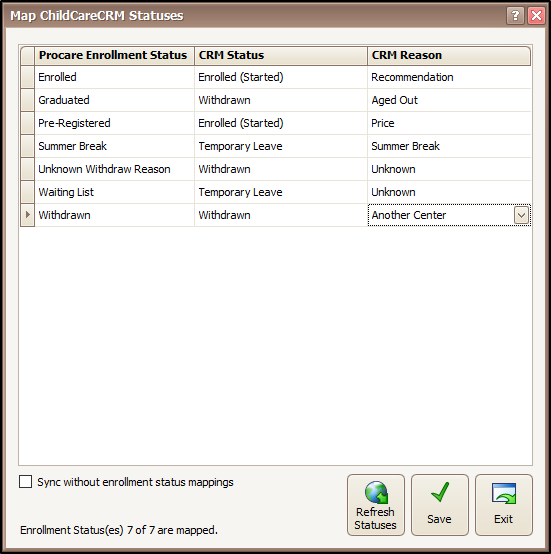
Click Save, then Exit. Please Note: Once the mapping is saved, prior to exiting, click Refresh Statuses to confirm all status from CRM are up to date.
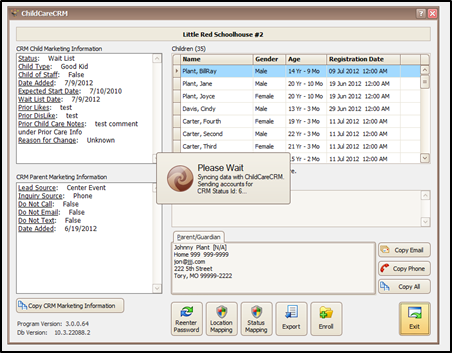
The sync will begin once Exit is selected on the ChildcareCRM Wait List Window.


Sort, View and Copy Family Information from CRM (in Procare)
- If you have multiple schools using ChildcareCRM, be certain to have the correct school selected in Procare before you begin.
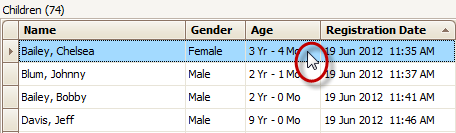
- At the ChildcareCRM Wait List screen (in Procare) you’ll see a list of children who are on your CRM waitlist but are not yet in Procare. You may sort children by Name, Gender, Age or Registration Date by clicking the headings above the list of children (right side). Click a second time to reverse the order.

- The names displayed are filtered to just the ones you have user access to in CRM. Select a child from the list on the right to display marketing information entered in ChildcareCRM for the child (top left) and parent (lower left). Please Note: If there is a red E in the far right column, that child has already been enrolled in Procare.
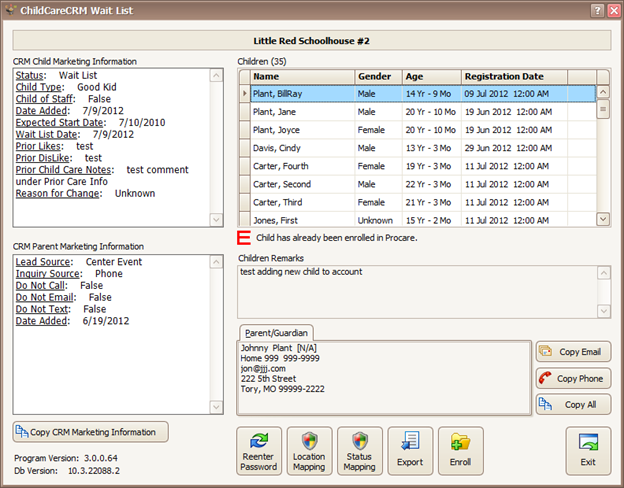
- Optional: Use the Copy CRM Marketing Information button to copy just the child and parent marketing data to the Windows clipboard. You may then paste it to Notepad, email, etc. The information will be recorded in the Child Log if you choose to do so when you enroll the child.

- Optional: Use Copy Email, Copy Phone or Copy All (phone, email and address) to copy Parent/Guardian information (lower right) to the Windows clipboard. You may then paste it to Notepad, email, etc. This information will also be imported when you enroll the child.


Import Families and Children to Procare
- Select a child you wish to enroll (right side).
- Click the Enroll button or double-click their name.

- A list of Children Pending Enrollment (for that family) is displayed. The child you initially selected will be checked (right side). To enroll other children for this family place a check next to their name(s)

Note: A yellow alert icon (!) means this person may already be in the system. Dbl-click the icon and choose the person in the system who should be merged with the person on the wait list. If the people shown as possible matches are not the same person, do not select anyone and ignore the alert.
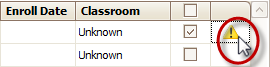
The icon will change to a red “M” symbol meaning the existing person will be updated with information from the selected person.

- Optional: Add another child or update information for an existing child at the same time.
a. Click the drop down arrow on the Add Child button (right side).
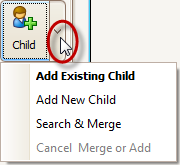
b. Choose Add Existing Child if there is a child already in Procare, on another family account (divorced parents) or in another Procare location (changing schools) who you want to add to this family. After adding them to the list of pending children, be sure to place a check next to them.
c. Choose Add New Child if the family gave you information about another child (verbally perhaps) but they were never added to the wait list. After adding them to the list of pending children, be sure to place a check next to them.
d. Choose Search & Merge if the child is already in Procare (an existing child) AND you wish to update their record with new information from the wait list. - Choose an Enroll Status, Enroll Date and Primary Classroom for each selected child.

- Decide if you want to import marketing information from ChildcareCRM to the Child’s Log Sheet. The first time you see this screen the Logging is Off warning appears.

a. Choose the Log Sheet Type to use, such as “ChildcareCRM” (lower left). If you do not select a log type the information will not be saved anywhere.

b. If a log sheet type is selected, a box will appear for you to type Additional Log Comments. There is a 2,000 character limit for all text imported to the log. See: Why is the log cut off or split into multiple log notes?

- When the children you wish to enroll are checked click Next.

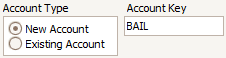
- If the Primary Payer has an account within Procare, the system will automatically match the account. If these children will be added to a New Account:
a. Mark New Account and type an Account Key used to look up this family – usually the first few letters of their last name.
b. Under the Parent/Guardian section confirm whether the person should be added as a New Payer on the account, their Relationship to the selected children and that you do intend to import them (the parent).Note: A yellow alert icon (!) means this person may already be in the system. This works the same as for children. See: Alert Icon
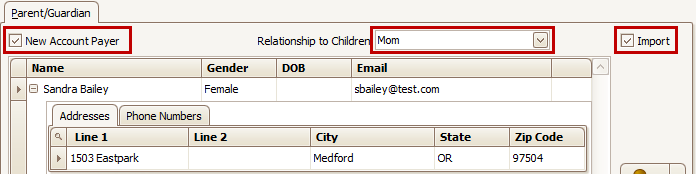
c. The payer is the person responsible for paying for this child. If the person listed is not the payer, click the drop down arrow on the Change button (right side) and choose one of the following:

c1. Choose Replace With Existing Person, if there is a person already in Procare you want to substitute as the payer for this family. The person originally shown will not be imported.
c2. Choose Replace With New Person to create someone new as the payer for this family. The person originally shown will not be imported.
c3. Choose Search & Merge if the person is already in Procare AND you wish to update their record with new information from the wait list. - Will these children be added to an Existing Account (family already in Procare)? If so:
a. Mark Existing Account and select a family from the Account Key list. By default only “visible” accounts are shown. Check the box to Include Hidden Accounts, if desired. Hidden accounts will appear in italics.

b. Choose the Primary Payer’s Relationship to the children you are importing. This refers to the current payer on the existing account.
c. Parent/Guardian section: Confirm the Relationship to Children for the person who registered the children. This person will be added as an additional payer on the account. (If they are not a payer, uncheck the box labeled Include as Payer on Existing Account.)

Note 1: If this person is the SAME AS THE EXISTING PAYER, you may choose not to import them (uncheck Import) or update their information (click the arrow on the Change button and choose Search & Merge).
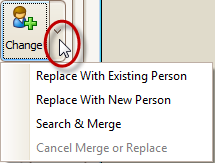
Note 2: To import someone else as an additional payer, click the arrow on the Change button to replace them with either and Existing Person or a New Person. The person you replace will not be imported.
Note 3: A yellow alert icon (!) means this person may already be in the system. This works the same as for children. See: Alert Icon - To complete the process click Enroll.

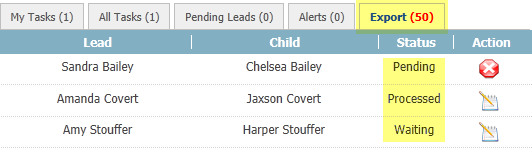
Note: Once a child is imported to Procare, the Export tab in ChildcareCRM will show their status change from “Pending” to “Processed”, or, in cases where the child’s enrollment date is in the future, it may say “Waiting”. Contact ChildcareCRM for details about how this appears in the ChildcareCRM system.


Export ChildcareCRM Wait List
You may export all your families on your CRM Wait List for use in another program, like Excel.
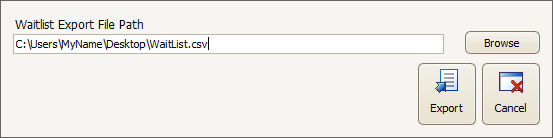
- Click Export (lower right).

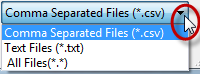
- Browse to or type the path AND file name to create, like C:\Users\MyName\Desktop\WaitList.csv. The file must include a valid extension, like .csv (comma separated values) or .txt (text) or any valid extension the program you intend to import the file to will accept.

- The browse button defaults to .csv, but you may choose .txt or another format. For use with Excel or other spreadsheet software, .csv is recommended.
- Click Export on the Waitlist Export File Path screen. YOU MUST TYPE A FILE NAME, like WaitList.csv in order for the export to work.
- Open the exported file in your third-party software, like Excel. The export file includes parent and child information.


Two-Way Integration option enabled.
Once you enable the Two-Way Integration setting from within the ChildcareCRM website, http://live.childcarecrm.com/login , a Data Sync process will run as you exit the extra. A window will briefly appear letting you know that the synchronization is in process before closing the extra. The sync allows CRM to be up-to-date (record/contact changes) to support improved communication to families/leads for CRM related tasks.
The data transmitted from Procare to ChildcareCRM contains:
- Parent/Lead information (person name, phone, email, address, relationship to child).
- Child information (name, gender, dob, classroom assignment, actual start date and “enrolled” periods of enrollment).
- Classroom information (names, times, ratio and max (children) as defined in Procare).
What Information is sent to ChildcareCRM for more detailed information.What Information is sent to ChildcareCRM for more detailed information.
Was this article helpful?