Profile Field Mapping
- 20 Mar 2025
- 2 Minutos para leer
- Impresión
Profile Field Mapping
- Actualizado en 20 Mar 2025
- 2 Minutos para leer
- Impresión
The content is currently unavailable in Spanish. You are viewing the default English version.
Resumen del artículo
¿Te ha resultado útil este resumen?
Gracias por sus comentarios
Name Update
Profile Field mapping was previously referred to as Custom Fields.
Schools can create profile fields for their Staff, Students, Parents and Leads by using the Profile Fields function. For example, if you want to have a particular certification date on file for your staff members, you can customize a field that will show up under all your staff profiles and allow for the school to enter a date to have on record.
Please Note: When profile fields are created for both Lead Students and Lead Parents, the data can be automatically synced to the student's profile once a lead status is changed to enrolled. Profile field mapping occurs once during enrollment, eliminating manual data entry and streamlining the registration process to save time for users.
Staff members with the appropriate permissions can create and manage profile fields under school settings. See: Staff Roles and Permissions for more information.
Creating Profile Fields
Profile fields can be created under the School Settings > Profile Fields page or when creating or editing a registration form.
Navigate to School Settings > Settings > Profile Fields.
Select Create Profile Field.
Select which group the profile field should be added to: Staff, Active Student, Parent, Lead Student, or Lead Parent.
When selecting Lead Student or Lead Parent, an additional option to 'Transfer this profile field to Active Student Profile (or Parent Profile) upon enrollment' is available. Selecting this option allows the lead profile fields to automatically transfer to the student profile (on the My School > Students page) when a lead's status is changed to Enrolled.
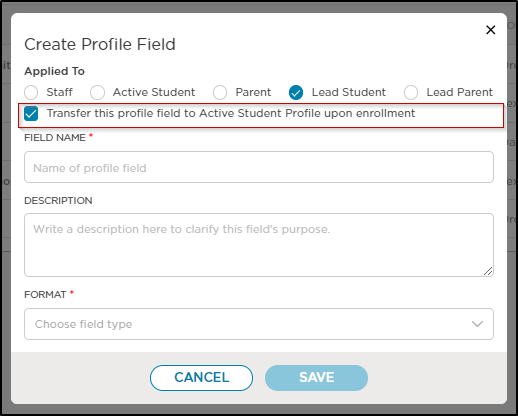
Enter the profile field name.
Enter a description of the field.
Select the Format of the field: Text, Date Picker, Number, Check Box, or Dropdown Menu.
Enter the Field Name and choose the Format.
Click Save.

Transferring Lead Profile Fields
The "Transferred To" column indicates if a profile field will be automatically transferred to the Student or Parent profile upon enrollment. If the field is blank, it will not be transferred. You also have the option to edit or delete profile fields as needed.
Note: This is a one-time transfer. Any changes made to the Lead profile after enrollment will not automatically update the Student profile.
Important Information
- Lead profile information is found by navigating to Leads > Lead > select a student.
- Student profile information is found by navigating to My School > Students > select a student.

Filling Out The Profile Fields
After the profile field has been created under School Setting, the field will appear under "Additional Info" when looking at the profiles associated with that attribute. In the image below you will be able to see a profile field that has been added to a staff profile. The name of the field is displayed, allowing you to select the pencil icon to edit the field. In the below example the format is a date picker. The yellow question mark provides the description of the field, input upon field creation.

Reports
To generate a report that includes your custom profile fields, follow these steps:
- Navigate to Reports and select Management Reports.
- Choose the Students and Family report.
- From the dropdown menu, select Custom (All Fields).
- Click Generate Report to view your customized data.

¿Te ha sido útil este artículo?