When receipts are printed a snapshot is taken at that point in time and automatically saved. These “stored receipts” may later be reprinted if a person loses their receipt or for any reason needs a duplicate copy.
Before You Begin
- Turn receipt printing on at the Receipt Options screen. Receipts will only be stored for those Payment Descriptions that are marked for receipts, such as “Pmt by Cash”, etc.
- Note: It’s best to have Print Receipt Numbers checked so receipts are easier to identify when reprinting.
- Record payments directly on a Family Ledger Card or through Quick Ledger Posting.
Getting There
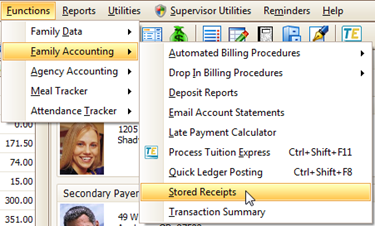
From the main screen of Family Data & Accounting go to Functions > Family Accounting > Stored Receipts.
Reprint a Receipt
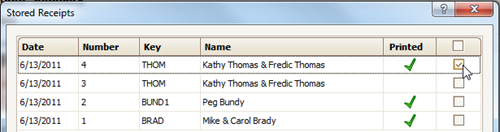
Place a check in the far right hand column to select receipts to be reprinted then click Print. An exact duplicate of the original receipt will be printed. If you have voided or changed the entry since the original posting those changes will not be reflected on the receipt. A green check in the Printed column indicates a receipt that has been printed at least once.
Hints:
- If you are unsure which is the correct receipt go to the Family Ledger Card and look for the receipt number in the Comments field. Then return to the Stored Receipts screen where the Number column shows the receipt number.
- You may Sort & Filter the list using the headings at the top like Name.
How Long are Receipts Stored?
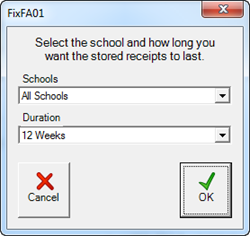
By default receipts are stored for two weeks. This may be extended up to 52 weeks by downloading a special support file. The longer receipts are stored the larger your overall database becomes.
To extend the length of time receipts are stored:
- From the Procare Home screen click Utilities > Download Procare Support File.
- Enter the password FA01 (use a zero, not the letter “O”) and click Download.
- Apply this change to All Schools, or if you have multiple locations you may specify a single school location.
- Choose a Duration (the length of time you wish to store receipts) then click OK.