Batch Recurring Payments
- 13 Mar 2024
- 6 Minutes to read
- Print
Batch Recurring Payments
- Updated on 13 Mar 2024
- 6 Minutes to read
- Print
Article Summary
Share feedback
Thanks for sharing your feedback!
Overview
Bolster your efficiency with Batch Recurring Payments.
Procare Desktop provides an option to send Recurring Payment Request links to multiple payers simultaneously via text message and email. Administrators can monitor the status of form submissions and receive instant email notifications when a payer submits their payment authorization form via link, offering status updates in real-time.
Who can use Batch Recurring Payments Request form?
This form will be available for all Desktop users using Family Accounting with Payment Processing. The permissions from this form match the individual recurring payments link.
Opening the form
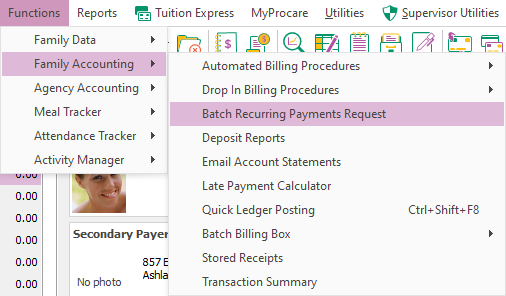
The Batch Recurring Payments Request form can be found at Functions > Family Accounting > Batch Recurring Payments Request.
The icon for the individual form still functions the same as it did before.
For information on how to send an individual payment request form see Set Up Recurring Payments.
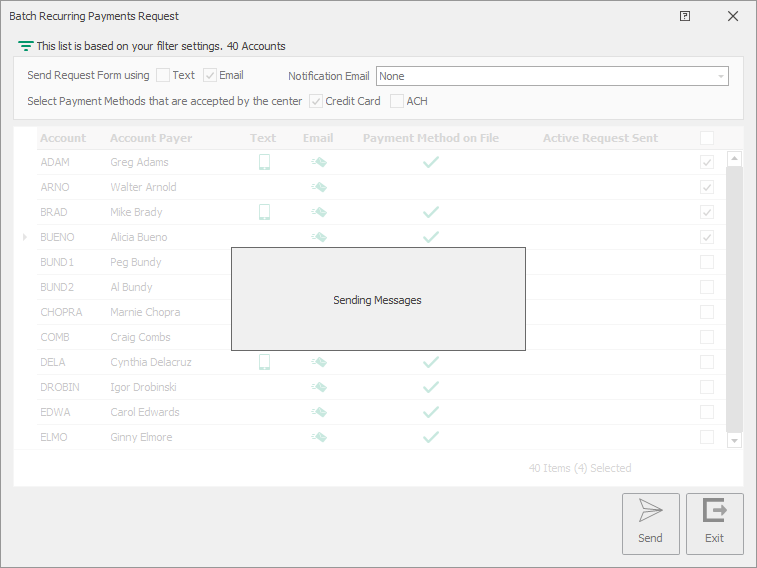
Anatomy of the BRPR Form
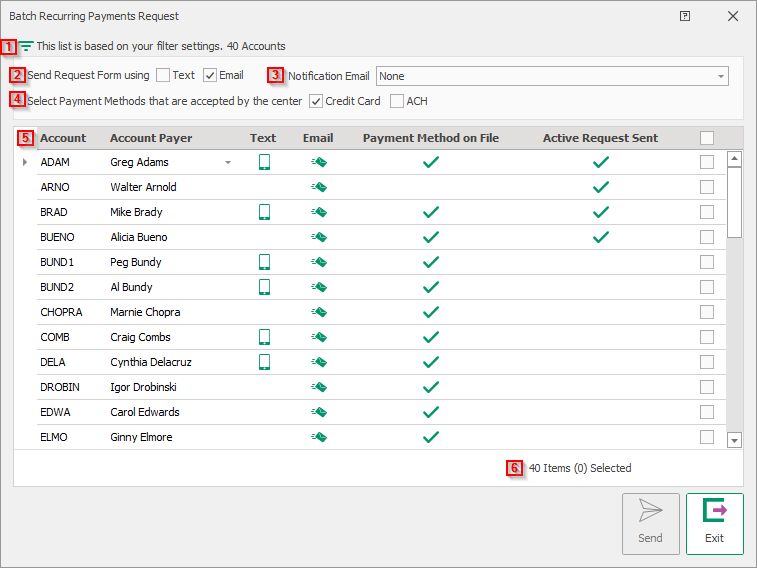
- “This list is based on your filter settings. ## Accounts” indicates that the form will display Accounts from any filters in place on the Account Summary screen, and this is the total when the form loaded. The BRPR Form could be filtered further but this count will remain the same.
- “Send Request Form using” gives the two methods available to send the links. Text will send the link to a texting number setup on the Payer’s record, and Email send to the email address on the Payer’s record.
- “Notification Email” lets you choose an email address to receive a notification of a successful payment method submitted. It is a pulldown menu with several system options, or a place for you to enter your own email address to use.
- “Select Payment Methods that are accepted by the center” initially loads unchecked, and the center chooses which options to display on the request link.
- The Grid displays the Accounts from the initial filter and shows the Primary Payer on each account, whether that payer has a valid texting address or email, whether there is a current payment method on file, and whether a link is still active for this account.
- This subtotal shows the number of records visible on screen after any filters by the last two columns and how many of those records are selected.
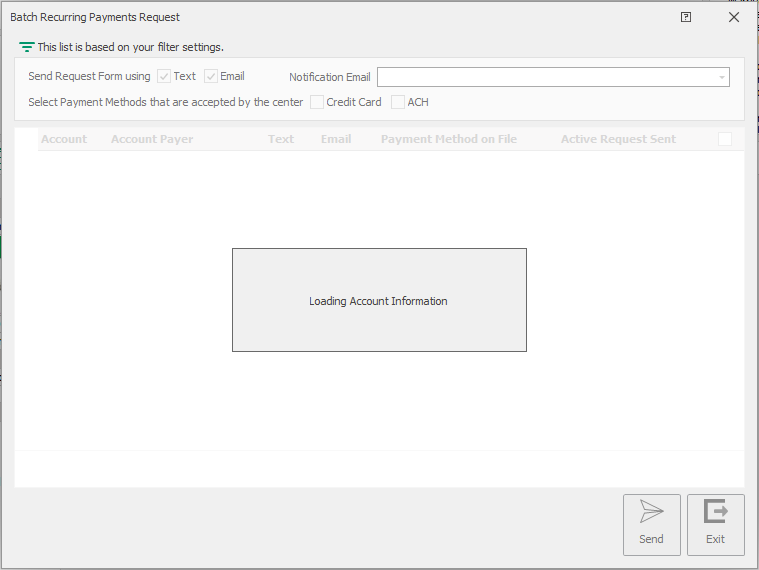
Form Loads
In some instances when you first open the Form, there will be a box that says “Loading Account Information” obscuring the Account list. This allows for time to make a secure call to the TE service to pull Payment Method on File statuses.
The first time the form loads both Text and Email will be checked, Notification Email will be set to None, and no Payment Methods will be selected. After you successfully send a link from this form, the setting for these three parameters is saved and will be loaded the next time you launch this form.
If you Exit the form without Sending, any changes to the parameters will not be saved.
Filters

The following filters are available:
- Send Request Form using Text and/or Email
- When one method is selected, upon clicking Send, it will send to all selected accounts using just this method.
- If both methods are selected, when you click Send, it will send to all selected accounts using both methods.
- Notification Email Please Note: The email address selected will receive a notification immediately when the payer submits the link successfully.
- The Reply To Email email from Procare Messaging Service or the From Email Address email from SMS
- The Email from the School Information under Regions and Schools
- None, which means no notification will be sent upon completion (but the Payers can still enroll successfully)
- enter email address is a placeholder allowing them to enter an email address, or multiple emails separated by ;
- Select Payment Methods that are accepted by the center - These options initially load blank, forcing the center to actively choose. This determines what options are displayed on the form for payments accepted, but are not tied to the payment methods this school is actively setup to process.
- Credit Card
- ACH
Accounts Listed
Each line of the Grid represents an Account from your Filter setting.

Account Payer
The Account Payer initially shows up as the Primary Payer from the account. This Payer will display, even if they do not have a valid Texting or Email address.
If you click the Payer’s name you get a pulldown menu of other Payers on the account. These Payers will be in the normal sort order, but if a Payer has no Texting or Email address then they will not display on this list.
If you select a different Payer, then the Text and Email columns will change accordingly and if the new Payer’s eligible contact methods are different from the previous Payers, then the state of the account selection box on the far right could be changed.
Text/Email
These boxes display an icon if there is a valid Texting address on that Payer record, and if that Payer has a valid Email address on their record. Changing the Payer can change these fields. This form does not show the exact text address or email address, just that one exists.
Payment Method on File
This is just a checkbox indicating that the Account has a valid payment method currently on file. No detail is shown, just a check if one exists. You can filter this column on whether a checkbox exists or not. This is specific to the Account, not the Payer, so will not change if you change the Payer.
Active Request Sent
This checkbox shows if there is still an Active Link for this Account. If the payer submits the link or the link expires, then nothing will show in this column. You can filter on whether a checkbox exists for an account or not. The link is for the entire account so even if you change Payers, there checkbox state will not change. The authorization form expires four days after it has been sent. Payers must complete the form in this time period. If needed, a new link can be issued using the same steps.
Account Selector
The checkboxes let you select accounts to send links to. The account selection box will be grayed out (in a disabled state) if the Payer is unable to be contacted by the currently selected communication methods.
- If you click the main Select All box at the top, it will select all currently enabled boxes.
- If Email is checked and the Payer has the Email icon, then the selection box will be enabled.
- If Text is checked and the Payer has the Text icon, then the selection box will be enabled.
- If the Pay does not have an icon matching a currently selected communication method, then the checkbox will be disabled.
- Checking or unchecking Email or Text will change the selection box statuses immediately. Changing the Payer on an Account record will change the selection boxes immediately.
- If a box was selected and a change is made to disable that box, then the box will also be unselected as well as disabled.
- If a box has been enabled, it will only be auto-selected if the Select All box at the top is checked.
Sending Links
Once you’ve selected at least one Account on the list, the Send button will be enabled for you to click. After you click the button you’ll get the alert below to review before you complete the process.
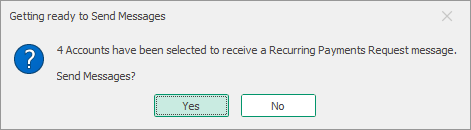
If it looks good then click Yes and you’ll see this window until the links have completed sending.
Select Accounts With Active Link
If any selected accounts have a check under Active Request Sent, an alert will display warning you that you can proceed, but the existing link will be cancelled so only the new link can be completed.
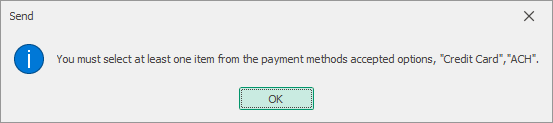
Payment Method Not Selected
Since the payment methods load unchecked by default, if you don’t choose any before clicking Send then you’ll see the warning below.
Was this article helpful?