The QuickBooks Link transfers financial data entered in Procare to QuickBooks as a journal entry. QuickBooks® and Quicken® are registered trademarks of Intuit® and have no affiliation with Procare Software®.
Overview
The Procare to QuickBooks Link is an add-on program (known as a Procare Extra) that creates an export file from Procare which includes your Family Accounting, Agency Accounting and Payroll transactions. This file may then be imported to QuickBooks as a journal entry.
Important! This program is NOT COMPATIBLE with any QuickBooks online edition, nor with Quicken.
Using QuickBooks
These instructions are intended solely for the purpose of using the Procare QuickBooks Link and are in no way intended to explain how to use QuickBooks. It is assumed the user is already familiar with and has established a Chart of Accounts in QuickBooks. Refer to your QuickBooks documentation for specific information about importing and exporting files.
Before You Begin
In Procare
You must have already set up the descriptions you wish to link with QuickBooks. This includes charges, credits, and payments established per the Family Accounting Overview and Agency Accounting Overview as well as employee withholdings per the Payroll Overview.
In QuickBooks
You MUST create the following customer names and accounts:
- For each of your schools, create a QuickBooks Customer that consists of the word “Procare” followed by a dash and the abbreviation for each school you have configured. For example, if you have 2 schools, with School Codes of S1 and S2, the QuickBooks Customer names would be Procare-S1 and Procare-S2. These customer names are specified in the export file to indicate the data is from a specific school in Procare.
- You will need to create a QuickBooks Chart of Accounts account named Balancing Account to adjust for any small differences due to rounding. Generally this is never used because the Procare export file is always a balanced entry, but is required as a safeguard.
- You will need to create a QuickBooks Asset account for undeposited payments, called something like Undeposited Funds. This is not a bank account, because the payments have not yet been deposited.
Export QuickBooks Chart of Accounts
From QuickBooks export the Chart of Accounts. See QuickBooks Help for assistance. Be sure to export it to a place you can easily find it later, for example you may want to create a folder on your desktop called “QuickBooks Files”. You may use this same folder for files exported from Procare. All exported files end with the extension .iif (Intuit Interchange Format).
Note: Exporting the Chart of Accounts is done just once unless you later make changes to the chart in QuickBooks.
Installation
Contact your Software Consultant for details and to add the QuickBooks link to your Procare Desktop License. There is no charge for this Extra.
- Log on to your computer with local administrator privileges and close all programs, including Procare.
- Download
- When installation is complete, restart Procare.
Using the Link – Getting There
From the Procare Home screen go to Utilities > Procare Extras > QuickBooks Link. The very first time you’ll be asked for your activation code.
Set the Chart of Accounts Location
On the top portion of the screen, choose the QuickBooks COA File (Chart of Accounts) you exported from QuickBooks. Procare will remember this location in the future.

Note: If you later modify the Chart of Accounts within QuickBooks it would be necessary to re-export the file. You may use the same file name (overwriting the existing one) or give it a new name. If you use a different name it will be necessary to reassign the Chart of Accounts location again on this screen.
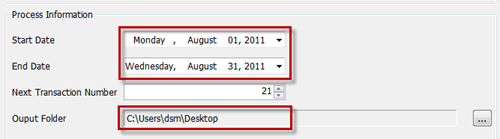
Set Process Information
On the bottom portion of this screen, each time you run the QuickBooks Link you will set the Start and End date to process, the Next Transaction (QuickBooks Journal Entry) number you’d like to use and designate the Output Folder location. In the future Procare will remember the output location and increment the Transaction Number by 1 automatically.
Click the Next Button.
Account Types Mapping
The first time you run the QuickBooks Link program, you will need to match your QuickBooks Account Types to the Procare Account Types. Thereafter Procare will remember the assignments. You can always review these assignments by clicking the box Review COA Account Type Mappings, available in the screen above, under Set the Chart of Accounts Location.
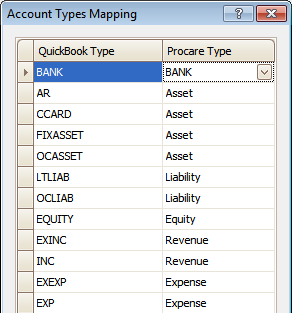
Click Save and then Exit.
Select Your School, Match Procare & QuickBooks Accounts and Process
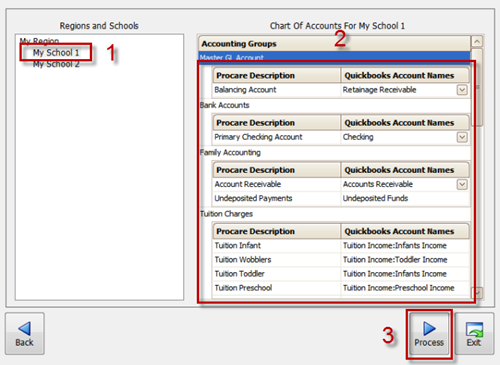
- Select the School.
- Match the QuickBooks Accounts to your Procare descriptions. Your previously defined Charge Credit Descriptions that have activity in the period being processed will be listed. Assign the corresponding QuickBooks Account Name to each Procare Description. Some descriptions may not have activity in the period, therefore any descriptions included for the first time in the future will need to be assigned. Once a description is assigned it remains assigned. These assignments do not change unless you later modify your QuickBooks Chart of Accounts, or the Procare Descriptions. ALL Procare Descriptions MUST be assigned (linked) to a QuickBooks Account for the given processing date range before the Process button becomes active.
- Note 1: If you do not have an appropriate QuickBooks Account Name (or no choice at all), then return to QuickBooks, make the appropriate changes and Export the Chart of Accounts again.
- Note 2: The QuickBooks Account called “Accounts Receivable” may not appear if QuickBooks was set to Cash Accounting at the time the Chart of Accounts was exported. In that case change the setting in QuickBooks to Accrual Accounting and Export the Chart of Accounts again.
- Scrolling Tip! If you have a large number of descriptions, using the scroll bar may cause the screen to jump too far ahead, past a description you need to set. The best way to review all descriptions is to click once on the top line, then use the down arrow (on your keyboard) to advance the screen one line at a time.
- Click the Process button to create the export file. If the Process button is grayed out there is at least one Procare Description that does not have a corresponding Quickbooks Account Name.
You will see the following confirmation screen where you will verify the location of the export file and the date range:
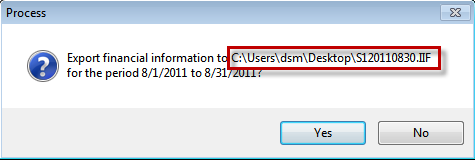
Click Yes to create the file. Next you will see a summary information box telling you where the file has been created along with the Journal Entry date and Entry number that will be created in QuickBooks when you import the file into your QuickBooks program:
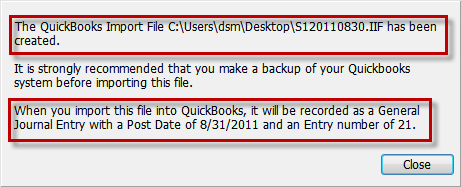
Go to QuickBooks and Import the file created above.
Note: Depending on the version of QuickBooks you are using the “Import” feature may be located in various places. You’ll need to be familiar enough with QuickBooks to locate the “Import” feature. For example in older versions “Import” was located under the “File” menu. In newer versions it may be located under File > Utilities > Import > Import IIF files.