Virtual Servers
- 20 Dec 2023
- 1 Minute to read
- Print
Virtual Servers
- Updated on 20 Dec 2023
- 1 Minute to read
- Print
Article summary
Did you find this summary helpful?
Thank you for your feedback!
This article covers how to add a setting in the Procare Licensing Service when you are installing Procare on a virtual server.
Before you begin
- These directions apply to new installations of Procare 10.2.5408 or higher (which will have Licensing Server Version 10.2.5 or greater).
- You must perform this procedure at the computer on which the Procare Licensing Server is installed, typically your main computer (server).
Edit the configuration file
- Open Notepad or a simple text editor. Confirm that it is searching for “All Files”
- In Notepad, select file, open, and browse to: C:\Program Files\Procare\Server\Procare.Licensing.Service.exe.config.
- You will need to have the area highlighted in blue in the config file.
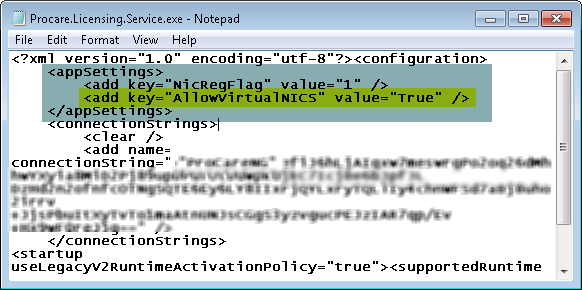
If the entire XML subsection of “appSettings” is missing, copy the following italicized text and paste it into the file above the “connectionString” entry:
<appSettings>
<add key="NicRegFlag" value="1" />
<add key="AllowVirtualNICS" value="True" />
</appSettings>
- If only the yellow highlighted part is missing, then copy the following text and paste it into the it into the appsettings section as shown in the yellow highlighted line below:
<add key="AllowVirtualNICs" value="True" />
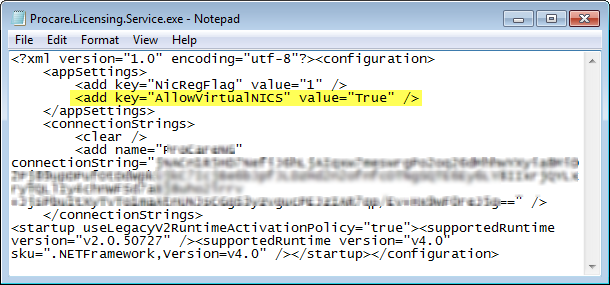
- Save and Exit the file.
- Manually start the Procare Licensing service.
Was this article helpful?