Transmit Attendance Records from Procare KinderConnect® Extra to Your State KinderSystem Web Portal
Use Procare free KinderConnect Extra to transmit attendance records from Procare to the KinderConnect® web portal for your state. We currently support:
Arizona
Louisiana
Missouri
New York
Texas
KinderSystem Texas Requirements
In September 2026, the state of Texas adopted new requirements for collecting and submitting child attendance records for subsidized child care. For Procare Desktop customers as of September 8, 2026, you must:
Use Engagement Functionality in Procare Desktop or
Use a KinderSystem tablet
Prerequisites
Contact Your State’s KinderConnect Team
Be sure to tell them you are using Procare Desktop.
State | Portal | Contact Information |
|---|---|---|
Arizona | You must already have access to the Arizona web portal: https://azcces.com/kinderconnect | Support Hours: Phone: 833-859-3433 or |
Louisiana | You must already have access to the Louisana CCAA web portal: https://ldoecc.com/kinderconnect/ | Support Hours: Monday through Friday, 7:00am-9:00pm CT Phone: 888-829-9258 or Email: supportla@kindersystems.com |
Missouri | You must already have access to the Missouri CCBIS web portal: https://ccbismo.info/ | Support Hours: 7 days a week, 6:00am-Midnight MT Phone: 833-866-1709, choose option 9 |
New York | You must already have access to the New York CCTA web portal: and you must contact the CCTA Support Center to activate your CCTA-account | Support Hours: Monday through Friday, 8:00am-8:00pm ET Phone: 877-369-6106, choose option 9 |
Texas | You must already have access to the Texas TWC CCCM web portal: | Support Hours: Monday through Friday, 6:00am-9:00pm CST Phone: 888-265-6461 |
| ||
Create a Child User Defined Field
Click Procare Home.
Click Configuration > System > Data Management > Tracking Items & User Defined Fields > User Defined Fields.
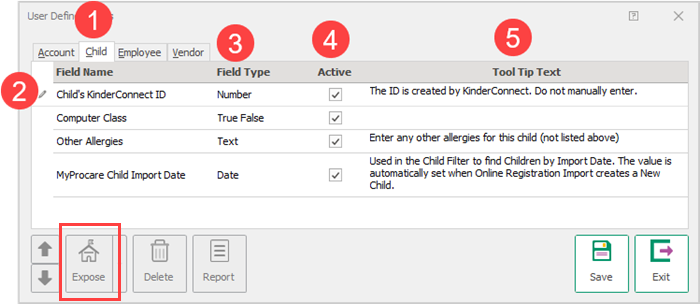
Click the Child tab > click in the top blank row.
Field Name - enter a field name staff will easily recognize. In our example we are using Child’s KinderConnect ID.
Field Type - select Number.
Active - by default, the Active field is checked.
Tool Tip Text - optional.
Click Save.
Expose (Optional) - use this option to view the field on the User Defined section for each Child. By selecting this option, you can run reports to include this field.
Select Expose to all Regions or
Set Individual Exposure Setting.
Note
Do not enter any data into this field for individual children. The information will be imported from your center via KinderConnect.
Download Procare’s KinderConnect Extra
Log on to your computer with local administrator privileges.
Close all programs including Procare Desktop.
Click here to download the kinderconnect setup file.
Locate the file in your download folder.
Double-click to install.
When installation is complete, restart Procare Desktop.
Open KinderConnect and Initial Setup
Click Procare Home.
Click Utilities > Procare Extras > KinderConnect.
Choose Set Provider IDs (right side of window).
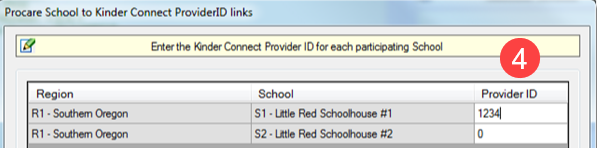
Enter the Provider ID assigned by your center for each of your participating locations. For locations that do not participate, leave the Provider ID as zero.

At the bottom of the window, enter the password you use to log into the web portal.
Password Note
If you have more than one location, enter your Group Password, which may be different from the individual school’s web portal password. Contact your state’s KinderConnect for the group password if you need one. If you use CCTA’s site, check under Providers > Groups.
Click Exit.
Set KinderConnect URLs
Select Set KinderConnect URLs.
Select your State.
Enter the Provider Management Website URL.
Enter your KinderConnect Service URL
Set Agency User Defined Field
Select Set Agency User Defined Field (right side).
Choose the Child User Defined Field you created to store each child’s ID. Only number fields are available to select.
Tooltip
The yellow box shows any tooltip you may have typed when creating the User Defined Field. The will be blank if you did not enter any tip.
Click Exit.
Set School-Agency Association
Click Set School-Agency Association (right side).
Select a participating school from the Procare School list.
Select an Agency to associate with the School above - pick the agency you are transmitting to.
Once selected, it will appear in the white box below with the associated agencies.
Repeat these steps for any other participating schools.
Click Exit.
Confirm Child IDs
This is done after the initial setup and each time a new child enrolls in the state agency program.
Child ID
To obtain the ID, the child must already be in your state’s web portal system.
Click Confirm Child IDs (lower right).
School\Provider - select the school from the dropdown list you want to continue setting up.
Scroll through the list of children.
Only children whose Enrollment Status is Enrolled as of today will appear.
To confirm the KinderConnect ID for a child who is not currently enrolled:
temporarily change their status to Enrolled
confirm the ID
switch their status back
Locate those children who participate in the state program (KinderConnect ID is zero).
To obtain the ID for a child:

Click once anywhere on that line to select them.
The KinderConnect ID is now highlighted. You can manually type in the ID number, but it is recommended to let Procare import it.
Click the Confirm ID button.
If the child was found in the state system, their ID number will appear along with a check in the Confirmed box.

Child Not Found
If they were not found, a message displays indicating what to look for. It could be:
the name is spelled differently
a missing initial
incorrect or missing date of birth
Log in to the state's web portal to review the information they have on file. You can access the portal via the KinderConnect button on the main window of Procare's KinderConnect Extra.
Repeat the previous step for all participating children.
When complete, click Exit.
Transmit Records
Whenever you need to send new or updated attendance records to the KinderConnect web portal, complete these steps.
Time
Actual times (not rounded) are transmitted.
Choose Select Schools.
Check the schools you want to update.
Click Exit.
Click Process Attendance.
Select a Start Date and End Date > click Start.
The attendance records from Procare are sent to your state's web portal. From there, you'll complete the final submission to the state agency.
Update and Re-transmit
You may need to frequently transmit data for the same date. Here are a few examples:
You transmit attendance for a certain time period and later discover a mistake.
You accidentally left off a child who should have been included, or some information is missing.
You included a child who is no longer eligible.
Transmit Corrections
Make additions or corrections in Procare Desktop, for example editing a Child’s Time Card or changing a Child’s Enrollment Status to Enrolled.
See Confirm the Child IDs for any newly eligible children.
Note
If a child is no longer eligible but still has attendance, manually set their ID to 0 on the Confirm Child IDs screen. Do not change the Child’s User Defined Fields screen.
Select a Start Date and End Date > click Start.
Review and Submit to the State
To finalize the the process, you must log into your state’s web portal. From within their site, you will:
Manually add:
a. Child absences
b. Center close dates/HolidaysReview and submit the records to your state.
If you have a problem with the sync, see Troubleshooting KinderConnect for common solutions.